Building Reliable Captive Portals: DNS Hijacking & Production Lessons
A captive portal is the login page you hit when connecting to public WiFi-hotels, airports, conference venues, cafes. You connect, open a browser, and instead of your destination, you see a terms-and-conditions page or a login form.
The mechanism seems simple: intercept traffic, show a page, let them through. But the gap between "works on my phone" and "works on every device" is vast. Different operating systems handle captive portal detection differently, and sometimes the exact same OS version behaves differently on two devices from the same manufacturer.
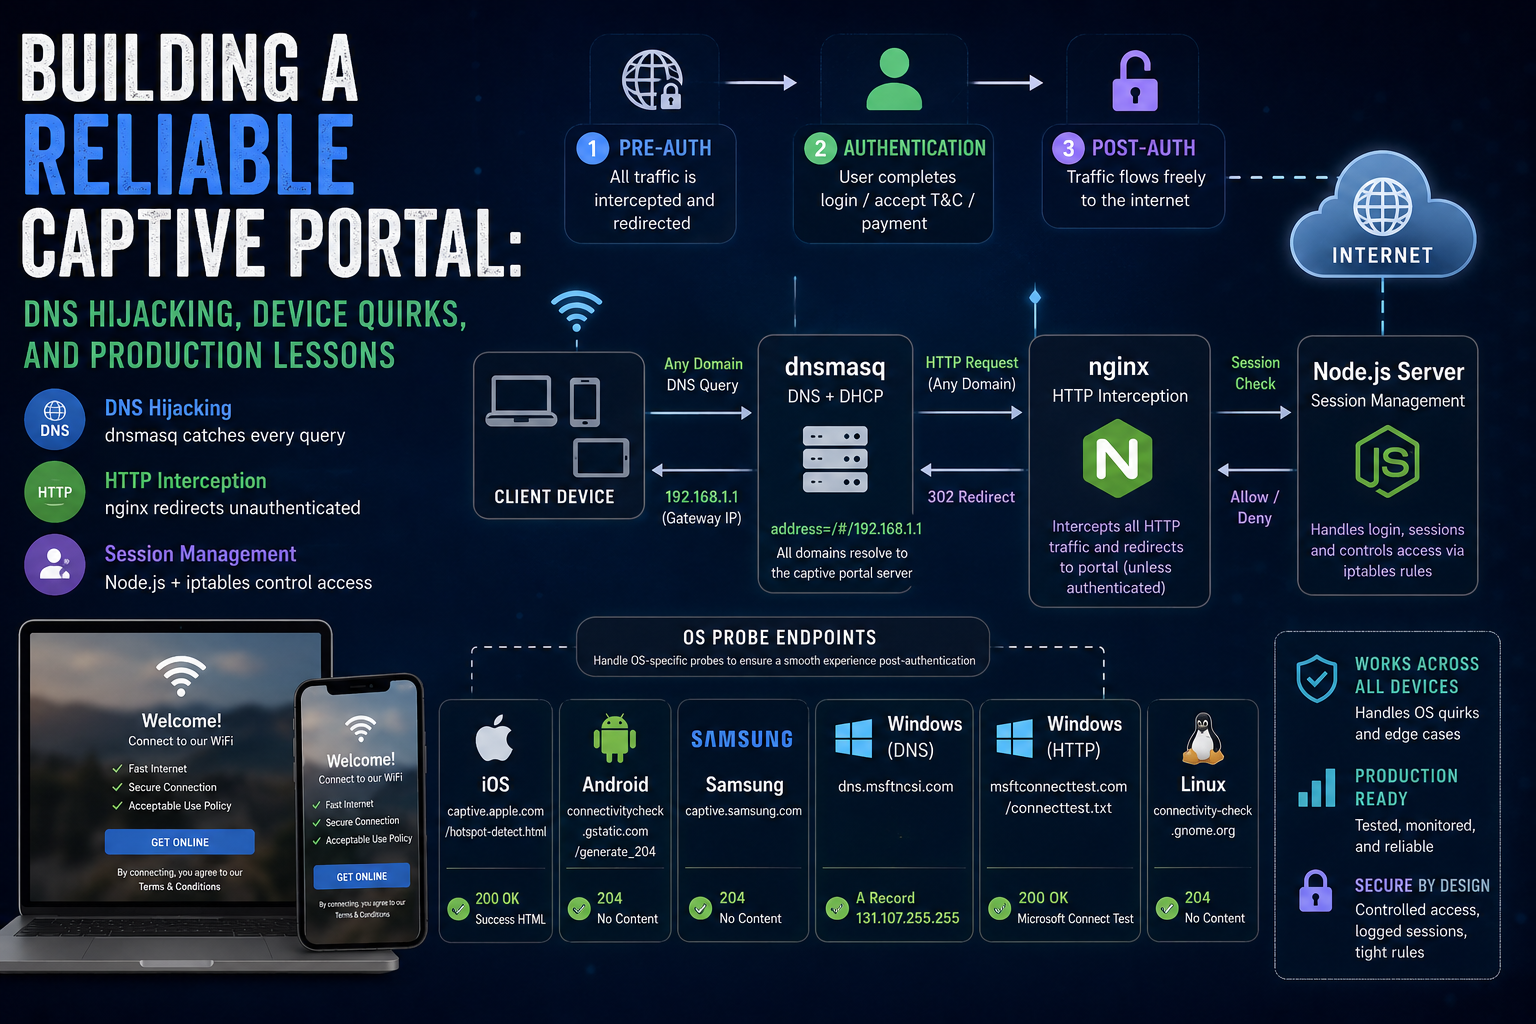
This post breaks down the architecture-dnsmasq for DNS hijacking, nginx for HTTP interception, and a Node.js server for session management-along with the device-specific quirks I encountered across iOS, Android, Windows, and Linux, and the patterns that made the system reliable in production.
How Captive Portals Work: The Redirection Flow
At its core, a captive portal is a DNS and HTTP interception system with three phases:
Pre-authentication: All traffic is intercepted and redirected to the portal
Authentication: User completes a flow (login, accept T&C, pay)
Post-authentication: Traffic flows freely to the internet
Client → DNS query (any domain) → dnsmasq → resolves to gateway IP
Client → HTTP request (any domain) → nginx → 302 redirect → captive portal page
Client → follows redirect → sees login page
After auth → iptables bypass rule added → traffic passes through
Phase 1: DNS Hijacking with dnsmasq
When a client connects to the WiFi network, DHCP assigns it an IP, gateway, and DNS server-all pointing to the captive portal server itself. dnsmasq runs as both the DHCP server and DNS resolver.
The critical config is the wildcard address rule:
# /etc/dnsmasq.conf
interface=wlan0
dhcp-range=192.168.1.2,192.168.1.254,255.255.255.0,12h
dhcp-option=3,192.168.1.1
dhcp-option=6,192.168.1.1

# Resolve ALL domains to the captive portal server
address=/#/192.168.1.1
address=/#/192.168.1.1 is the captive portal's foundation. Every DNS query-google.com, apple.com, microsoft.com, any-domain.xyz-returns 192.168.1.1. The client has no way to reach the actual internet because it can't resolve any real IP addresses.
This directive matches all domains for A-record (IPv4) queries. AAAA (IPv6) queries get :: by default. For captive portals running on IPv4-only networks, this is sufficient. If you're dual-stack, you'd add a similar rule for AAAA records.
There's a tension with the wildcard approach though. Some OS-level detection relies on specific DNS responses-Windows NCSI, for example. If your wildcard hijacks dns.msftncsi.com, Windows assumes there's no internet and never sends the HTTP probe. You'd think the cleanest approach is the wildcard, but in practice you sometimes need exceptions for OS-specific probe domains.
Phase 2: HTTP Interception with nginx
With all DNS resolving to the local server, every HTTP request hits nginx. The default server catches everything and redirects to the captive portal:
# /etc/nginx/sites-available/captive-portal
server {
    listen 80 default_server;
    server_name _;

    location / {
        return 302 http://captive.portal.local/login?dst=$scheme://$host$request_uri;
    }
}
Operating systems send captive portal detection probes-requests to specific URLs to check if they've been redirected. If your nginx returns a 302 for every URL including these probes, the OS detects the portal and shows the notification.
The real problem is post-authentication. After a user authenticates, the OS sends these same probes again. If you're still redirecting, the OS thinks the portal is still blocking traffic and shows "Sign in to network" repeatedly. Your authenticated users see this notification forever.
You need dedicated handlers that return success responses for authenticated clients, while redirecting unauthenticated ones to the portal:
# /etc/nginx/sites-available/os-probes
server {
    listen 80;
    server_name captive.apple.com www.apple.com;

    location /hotspot-detect.html {
        proxy_pass http://127.0.0.1:3000/check-apple;
    }
}

server {
    listen 80;
    server_name connectivitycheck.gstatic.com www.gstatic.com;

    location /generate_204 {
        proxy_pass http://127.0.0.1:3000/check-android;
    }
}

server {
    listen 80;
    server_name www.msftconnecttest.com msftconnecttest.com;

    location /connecttest.txt {
        proxy_pass http://127.0.0.1:3000/check-windows;
    }
}

# Catch-all: generate_204 requests from various Android builds
location = /generate_204 {
    proxy_pass http://127.0.0.1:3000/check-generic;
}
Each OS expects a specific response:
OS | Probe URL | Expected Response |
|---|---|---|
iOS |
|
|
Android |
|
|
Samsung |
|
|
Windows DNS |
| Valid DNS response (don't hijack) |
Windows HTTP |
|
|
Linux |
|
|
Phase 3: Session Management with Node.js
The Node.js server handles authentication, session tracking, and communicates with iptables to grant or revoke access.
import express from 'express';
import { exec } from 'child_process';

const app = express();
const sessions = new Map<string, Session>();

interface Session {
  mac: string;
  ip: string;
  sessionToken: string;
  createdAt: number;
  expiresAt: number;
}

// Login page - server-rendered, no JS dependency
app.get('/login', (req, res) => {
  res.send(`
    <!DOCTYPE html>
    <html>
    <head>
      <meta name="viewport" content="width=device-width, initial-scale=1">
      <title>WiFi Access</title>
      <style>
        body { font-family: -apple-system, sans-serif; max-width: 400px; margin: 2em auto; padding: 0 1em; text-align: center; }
        button { background: #007aff; color: white; border: none; padding: 1em 2em; border-radius: 8px; font-size: 1.1em; cursor: pointer; }
      </style>
    </head>
    <body>
      <h1>Welcome to Guest WiFi</h1>
      <p>Accept the terms to get online.</p>
      <form action="/auth" method="POST">
        <button type="submit">Accept & Connect</button>
      </form>
    </body>
    </html>
  `);
});

// Authentication handler
app.post('/auth', async (req, res) => {
  const clientIp = req.ip;
  const clientMac = await getMacByIp(clientIp);
  const sessionToken = crypto.randomUUID();

  const session: Session = {
    mac: clientMac,
    ip: clientIp,
    sessionToken,
    createdAt: Date.now(),
    expiresAt: Date.now() + 24 * 60 * 60 * 1000,
  };

  sessions.set(sessionToken, session);

  await addIptablesBypass(clientIp, clientMac);

  res.cookie('session', sessionToken, {
    httpOnly: true,
    sameSite: 'lax',
    maxAge: 24 * 60 * 60 * 1000,
  });

  // Don't redirect to destination - this causes the redirect problem
  res.redirect('/connected');
});

// OS detection probe handlers
app.get('/check-apple', async (req, res) => {
  const authed = await isAuthenticated(req);
  if (authed) {
    res.type('text/html');
    res.send('<HTML><HEAD><TITLE>Success</TITLE></HEAD><BODY>Success</BODY></HTML>');
  } else {
    res.redirect('/login');
  }
});

app.get('/check-android', async (req, res) => {
  const authed = await isAuthenticated(req);
  res.status(authed ? 204 : 302).end();
});

app.get('/check-windows', async (req, res) => {
  const authed = await isAuthenticated(req);
  if (authed) {
    res.type('text/plain').send('Microsoft Connect Test');
  } else {
    res.redirect('/login');
  }
});

async function isAuthenticated(req: express.Request): Promise<boolean> {
  const sessionToken = req.cookies?.session;
  if (!sessionToken) return false;

  const session = sessions.get(sessionToken);
  if (!session || Date.now() > session.expiresAt) {
    sessions.delete(sessionToken);
    return false;
  }
  return true;
}
The iptables Bypass
Traffic separation requires careful iptables management. The FORWARD chain controls whether client traffic reaches the internet. The PREROUTING chain controls redirects to the captive portal.
# Initial setup - redirect all traffic to captive portal
iptables -t nat -A PREROUTING -i wlan0 -p tcp --dport 80 -j REDIRECT --to-port 8080
iptables -t nat -A PREROUTING -i wlan0 -p tcp --dport 443 -j REDIRECT --to-port 8443
iptables -A FORWARD -i wlan0 -j DROP

# After auth - insert bypass rules BEFORE the redirect
iptables -t nat -I PREROUTING -m mac --mac-source AA:BB:CC:DD:EE:FF -j RETURN
iptables -I FORWARD -m mac --mac-source AA:BB:CC:DD:EE:FF -j ACCEPT
The -I (insert) puts the bypass at the top of the chain. The -A (append) redirect rule is at the bottom. When a matching MAC appears, iptables returns early and skips the redirect. This approach means you never need to remove and re-add the redirect rules-only the exception rules.
async function addIptablesBypass(ip: string, mac: string): Promise<void> {
  const commands = [
    `iptables -t nat -C PREROUTING -m mac --mac-source ${mac} -j RETURN 2>/dev/null || iptables -t nat -I PREROUTING -m mac --mac-source ${mac} -j RETURN`,
    `iptables -C FORWARD -m mac --mac-source ${mac} -j ACCEPT 2>/dev/null || iptables -I FORWARD -m mac --mac-source ${mac} -j ACCEPT`,
  ];
  for (const cmd of commands) {
    await exec(cmd, { timeout: 5000 });
  }
}

async function removeIptablesBypass(ip: string, mac: string): Promise<void> {
  const commands = [
    `iptables -t nat -D PREROUTING -m mac --mac-source ${mac} -j RETURN`,
    `iptables -D FORWARD -m mac --mac-source ${mac} -j ACCEPT`,
  ];
  for (const cmd of commands) {
    await exec(cmd, { timeout: 5000 }).catch(() => {});
  }
}
The Device Problem: OS-by-OS Breakdown
After deploying this across real venues, here's what actually happened with each OS.
iOS: The Gold Standard
iOS was by far the most reliable and easiest platform to support. The captive portal detection is consistent, predictable, and well-documented. Every iOS device I tested behaved the same way.
The flow:
Device connects to WiFi
iOS probes
captive.apple.com/hotspot-detect.htmlGets a 302 redirect → Captive Network Assistant (CNA) opens automatically
CNA loads the portal login page
User accepts terms → iOS re-probes
Gets the success response → CNA dismisses, "Connected" shown
The CNA has limitations-no JavaScript, no localStorage, no cookies from Safari. But once you know these, you design around them and it just works. No surprises.
The CNA is essentially a Safari WebView with JavaScript disabled. It can render HTML forms, follow redirects (up to a point), and handle cookies set during the current CNA session. It just can't run JS, so your React/Vue login page won't work. Server-rendered HTML forms work fine.
One caveat: iOS has a redirect limit in the CNA. If your portal chain involves multiple redirects (captive.apple.com → custom domain → HTTPS fallback → login page), the CNA gives up after one or two hops. Keep the redirect chain flat: captive.apple.com → login page. That's it.
Android: The Unpredictable One
Android was the hardest. Not because the protocol is complex, but because behavior varies wildly across devices, manufacturers, and OS versions. I've seen a Pixel 7 handle the portal perfectly while a Samsung Galaxy S23 on the same Android version kept re-triggering the captive portal notification in a loop.
The 204 problem: Returning 204 No Content from generate_204 after authentication is the documented approach. On most devices it works. But some devices-particularly Samsung and Xiaomi-keep polling generate_204 every few seconds even after getting a 204. On these devices, the captive portal notification pops up repeatedly, dismissing and reappearing in a loop. The issue isn't that the 204 is wrong-it's that the device's connectivity checker doesn't accept it as a final answer and keeps re-verifying.
The inconsistent detection problem: Some Android devices reliably detect the captive portal on connection. Others-especially Chinese OEMs with custom Android builds-don't trigger the portal notification at all. The user connects to WiFi, the device shows "Connected", but all HTTP traffic is blocked. The user has no idea they need to open a browser and navigate to an HTTP URL manually.
This happens because manufacturers customize the captive portal detection logic. Google's AOSP implementation checks connectivitycheck.gstatic.com/generate_204, but manufacturers like Samsung, Xiaomi, Huawei, and OnePlus override this with their own servers. If your nginx only handles the standard Google URL but not the Samsung URL, Samsung devices won't detect the portal.
The fix wasn't elegant: I had to handle every manufacturer probe URL I could find and accept that some devices would need manual intervention. The manufacturer probe URL list grew over time as new devices appeared in the logs:
Manufacturer | Probe URL |
|---|---|
Google/AOSP |
|
Samsung |
|
Xiaomi |
|
Honor/Huawei |
|
OnePlus |
|
Each of these needs to return 302 pre-auth and 204 post-auth. Miss one, and users of that brand see a broken experience.
Windows: NCSI and Done
Windows uses the Network Connectivity Status Indicator (NCSI) with a two-phase check:
DNS probe: Resolves
dns.msftncsi.com→ expects address131.107.255.255HTTP probe: Fetches
http://www.msftconnecttest.com/connecttest.txt→ expects bodyMicrosoft Connect Test
If you return the wrong DNS response for dns.msftncsi.com, Windows assumes there's no internet and never sends the HTTP probe. The WiFi icon shows "No internet, secured" and users don't know to open a browser.
The fix is simple: don't hijack dns.msftncsi.com:
# dnsmasq exception for Windows NCSI
server=/msftncsi.com/8.8.8.8
And handle the HTTP probe URL:
server=/msftconnecttest.com/8.8.8.8
Once these were configured correctly, Windows worked consistently across all versions (10, 11, Server). It was the least problematic platform after initial setup. We didn't touch Windows handling after the first deployment.
Linux: Also Just Works
Linux desktop environments use a similar approach. GNOME probes connectivity-check.gnome.org (or a configurable URL) and expects a 204. KDE has its own check. But in practice, Linux users are technical enough to open a browser and hit any HTTP URL if the portal doesn't trigger automatically.
NetworkManager on most distributions supports captive portal detection. If configured correctly, it shows a notification prompting the user to log in. The default configuration just works with standard HTTP redirects.
Like Windows, Linux was handled during initial development and didn't need ongoing attention. The browser-based flow (open browser → get redirected → accept → connect) worked reliably across Ubuntu, Fedora, Arch, and Debian.
The Redirect Problem
This is the one issue that cut across all platforms and took the longest to debug.
The flow that caused it:
User connects to WiFi
OS detects captive portal, opens a restricted browser (CNA, Android WebView, etc.)
User accepts terms on the portal page
Portal redirects user to their intended destination (google.com, twitter.com, whatever was in the
dstparameter)The destination page opens inside the captive portal's browser context-not in the user's real browser
User thinks "everything is opening in this strange window" and doesn't know how to escape
On iOS, the CNA would show google.com rendered inside its stripped-down browser. The user could navigate but had no address bar, no tabs, no way to understand they were still in the captive portal assistant. On Android, the same thing happened in the WebView that showed the portal page.
The fix: don't redirect to the user's destination. Instead, redirect to a page that says "You're connected!" and instructs them to close the captive portal browser and open their normal browser.
// Instead of:
app.post('/auth', async (req, res) => {
  // ...
  res.redirect(req.body.dst || 'http://google.com');
});

// Do:
app.post('/auth', async (req, res) => {
  // ...
  res.redirect('/connected');
});

// Connected page
app.get('/connected', (req, res) => {
  res.send(`
    <!DOCTYPE html>
    <html>
    <head>
      <meta name="viewport" content="width=device-width, initial-scale=1">
      <meta http-equiv="refresh" content="5;url=http://captive.apple.com">
      <title>Connected</title>
      <style>
        body { font-family: -apple-system, sans-serif; text-align: center; padding: 2em; }
        h1 { color: #34c759; }
      </style>
    </head>
    <body>
      <h1>You're Connected!</h1>
      <p>Close this window and open your browser again.</p>
      <p>You'll be redirected shortly.</p>
    </body>
    </html>
  `);
});
The meta refresh to captive.apple.com at the end is a nudge to trigger iOS's re-probe. The OS sees captive.apple.com returning the success page and marks the network as connected.
This seems counterintuitive-why not send users directly to their destination?-but it's the most reliable approach. The captive portal browser context is a temporary environment. Don't try to make it a real browser. Just get the user out of it.
Reliability Patterns
1. MAC + IP + Cookie Triple Binding
MAC randomization (iOS 14+, Android 10+) broke MAC-only session tracking. A device reconnecting gets a new MAC, appearing as a new client.
Bind all three identifiers and accept that some sessions will be ephemeral:
function getSessionKey(req: express.Request): string {
  const mac = req.headers['x-client-mac'] || '';
  const ip = req.ip;
  const token = req.cookies?.session || '';
  return `${mac}:${ip}:${token}`;
}
When any one component changes, treat it as a new session. The cookie is the most stable identifier-it persists across reconnects within the same browser.
2. Session Expiry and Graceful Renewal
Sessions must expire. Network resources aren't infinite. But cutting users off mid-stream creates a terrible experience.
// Check expiry on every request
function getSession(req: express.Request): Session | null {
  const token = req.cookies?.session;
  if (!token) return null;

  const session = sessions.get(token);
  if (!session) return null;

  if (Date.now() > session.expiresAt) {
    sessions.delete(token);
    removeIptablesBypass(session.ip, session.mac);
    return null;
  }

  // Renew if within 10% of expiry
  const remaining = session.expiresAt - Date.now();
  const totalDuration = session.expiresAt - session.createdAt;
  if (remaining < totalDuration * 0.1) {
    session.expiresAt = Date.now() + totalDuration;
  }

  return session;
}

// Cleanup expired sessions
setInterval(async () => {
  const now = Date.now();
  for (const [token, session] of sessions) {
    if (now > session.expiresAt) {
      await removeIptablesBypass(session.ip, session.mac);
      sessions.delete(token);
    }
  }
}, 60_000);
3. Handle the HTTPS Problem
Modern internet is mostly HTTPS. Your captive portal can't redirect HTTPS traffic without breaking the TLS handshake. Two approaches work in production:
Option A: iptables REDIRECT for port 443 This captures the TCP connection before TLS starts. Nginx can then terminate with a self-signed cert.
iptables -t nat -A PREROUTING -i wlan0 -p tcp --dport 443 -j REDIRECT --to-port 8443
server {
    listen 8443 ssl default_server;
    ssl_certificate /etc/nginx/ssl/captive.crt;
    ssl_certificate_key /etc/nginx/ssl/captive.key;

    location / {
        return 302 http://captive.portal.local/login;
    }
}
Users see a certificate warning. Most will click through.
Option B: DNS-only, no HTTPS interception Let HTTPS connections fail silently. The OS detects the portal via HTTP probes and shows the notification. After auth, HTTPS works normally.
# Only redirect HTTP
iptables -t nat -A PREROUTING -i wlan0 -p tcp --dport 80 -j REDIRECT --to-port 8080
In practice, Option B was more reliable across devices. The certificate warning on Option A confused non-technical users, and some devices refused to proceed past the warning entirely.
4. DNS Cache Management
Aggressive DNS caching causes a problem: even after authentication, the device remembers that google.com = 192.168.1.1.
Mitigations:
Set low TTLs on your hijacked DNS responses
After authentication, redirect the user to a page that triggers DNS refresh
# /etc/dnsmasq.conf
max-ttl=60
5. Minimum Viable Login Page
Your login page must work in iOS CNA, Android WebView, and every browser. The formula:
Single HTML file, under 50KB total
Zero external dependencies (no CDN, no fonts, no scripts)
Inline all CSS
Server-rendered forms (POST-based auth)
No JavaScript required for core flow
Responsive viewport meta tag
Here's the production page I used:
<!DOCTYPE html>
<html lang="en">
<head>
<meta charset="UTF-8">
<meta name="viewport" content="width=device-width, initial-scale=1">
<title>WiFi Access</title>
<style>
* { box-sizing: border-box; margin: 0; padding: 0; }
body { font: -apple-system, BlinkMacSystemFont, 'Segoe UI', Roboto, sans-serif; background: #f5f5f7; color: #1d1d1f; display: flex; min-height: 100vh; }
.container { margin: auto; padding: 2rem; max-width: 400px; width: 100%; text-align: center; }
h1 { font-size: 1.5rem; font-weight: 600; margin-bottom: 0.5rem; }
p { color: #6e6e73; margin-bottom: 1.5rem; line-height: 1.5; }
button { background: #0071e3; color: #fff; border: none; border-radius: 12px; padding: 0.75rem 2rem; font-size: 1rem; cursor: pointer; width: 100%; }
button:hover { background: #0077ed; }
.note { font-size: 0.75rem; color: #6e6e73; margin-top: 1rem; }
</style>
</head>
<body>
<div class="container">
<h1>Guest WiFi</h1>
<p>By connecting, you agree to our acceptable use policy.</p>
<form method="POST" action="/auth">
<button type="submit">Accept & Connect</button>
</form>
<p class="note">Free WiFi service.</p>
</div>
<noscript><p>JavaScript is optional. The page works without it.</p></noscript>
</body>
</html>
This renders correctly in iOS CNA, every Android WebView, and all desktop browsers. No JavaScript, no external assets, under 5KB.
The Testing Matrix
You need physical devices. Emulators don't have the OS-level captive portal detection logic.
Minimum viable test set:
iPhone: iOS 16 and iOS 17/18
Android: Samsung Galaxy (most popular globally), Google Pixel (stock Android), OnePlus or Xiaomi (custom OS)
Windows: Laptop with Edge, Chrome, Firefox
Linux: Laptop with GNOME or KDE, any browser
Test flow on each device:
Connect to WiFi
Wait for portal notification (or open browser manually)
Complete auth flow
Verify internet access
Disconnect and reconnect
Verify session persistence
Architecture Summary
┌─────────────┐  DNS lookup  ┌──────────────┐
│   Client     │ ──────────→  │   dnsmasq     │
│  (any OS)    │              │ 192.168.1.1   │
│              │  HTTP/HTTPS  │   port 53     │
│              │ ──────────→  └──────┬───────┘
│              │                     │
│              │            ┌────────▼───────┐
│              │            │   iptables      │
│              │            │  PREROUTING     │
│              │            │  :80 → :8080    │
│              │            │  :443 → :8443   │
│              │            └────────┬───────┘
│              │                     │
│              │            ┌────────▼───────┐
│              │            │   nginx         │
│              │            │  default_server │
│              │            │  OS probe hosts │
│              │            └────────┬───────┘
│              │                     │
│              │            ┌────────▼───────┐
│              │            │   Node.js       │
│              │            │  /login         │
│              │            │  /auth          │
│              │            │  /connected     │
│              │            │  /check-*       │
│              │            │  session map    │
│              │            │  iptables mgmt  │
│              └────────────┤                 │
│                           └────────────────┘
Lessons Learned
1. iOS Is the Most Reliable. Design for It First.
Apple's captive portal detection is consistent across devices and OS versions. The CNA has quirks (no JS, redirect limits), but those quirks are known and stable. Once you build for the CNA, it works on every iPhone and iPad. No surprises.
Design your portal page for the CNA first-server-rendered HTML, no JS, flat redirect chain. Then add enhancements for browsers.
2. Android Is a Fragmentation Nightmare
The same Android version behaves differently on different manufacturers' devices. Samsung, Xiaomi, OnePlus, and Google all have their own captive portal detection implementations, their own probe URLs, and their own tolerance for 204 responses. Some devices re-probe aggressively even after getting a correct 204. Some don't probe at all.
You can't fix Android fragmentation. You can only cover the major OEMs and accept edge cases.
3. Don't Redirect Users to Their Destination
The redirect-to-destination pattern feels natural-user wanted google.com, let's send them there. But in practice, the destination renders inside the captive portal WebView, and users get stuck. Always redirect to a "You're Connected" page that tells users to close the captive portal browser.
4. Windows and Linux Are Easy
Set up NCSI correctly for Windows, and it works on every version. Linux just works with standard HTTP redirects. Neither platform caused issues after initial setup. If you're prioritizing debugging time, spend it on Android.
5. The Return of the 204
Android's 204 response for generate_204 works on most devices, but some Samsung and Xiaomi devices keep polling even after a correct 204. The captive portal notification keeps reappearing and dismissing in a loop. There's no documented fix for this-it's a device-level bug. The best mitigation is to accept it and move on.
6. Log Manufacturer Probe URLs
Unknown probe URLs show up as 404s in your nginx logs. New Android devices with custom probe URLs appear regularly. Set up log monitoring to catch these, and add handlers as they appear.
function logProbe(type: string, clientIp: string, userAgent: string, result: string) {
  console.log(JSON.stringify({
    timestamp: new Date().toISOString(),
    type: 'os_probe',
    probe: type,
    clientIp,
    userAgent,
    result,
  }));
}
Conclusion
A captive portal seems like a solved problem-redirect, auth, pass through. In practice, the OS ecosystem makes it a whack-a-mole game. iOS is predictable and reliable. Android is a fragmentation minefield. Windows and Linux are easy once configured.
The architecture is straightforward: dnsmasq for DNS hijacking, nginx for HTTP interception, Node.js for session management, iptables for access control. The complexity is in the device-specific responses, the redirect-to-destination trap, and Android's inconsistent behavior.
Build for iOS CNA first. Don't redirect users to their destination. Handle every Android manufacturer probe URL. Accept that some Android devices will never work perfectly. Everything else falls into place.